Configuring Next.js + ASP.NET Core + YARP with .NET Aspire
How to configure Next.js + ASP.NET Core + YARP (Reverse Proxy) with .NET Aspire
This article explains how to create a project that combines Next.js and ASP.NET Core, and use YARP (Yet Another Reverse Proxy) to connect the frontend and backend. Here's the overall flow.
- Build a Web API using ASP.NET Core.
- Build a frontend using Next.js.
- Manage the project with .NET Aspire and implement a reverse proxy with YARP.
- Explain how to call the ASP.NET Core Web API from Next.js.
The source code for this article is here (https://github.com/atman-33/nextjs-aspire)
Reference URL
The detailed steps are based on the following article:
Configuring Next.js + ASP.NET Core with .NET Aspire (with YARP)
The setup steps on the site above didn't resolve a CORS error that occurred when calling the Web API from a Next.js CSR page, so I hope this article helps as a fix for that error.
1. Create the Web API with ASP.NET Core
Create an empty solution
First, create an empty solution. We'll name the solution NextJSAspire.
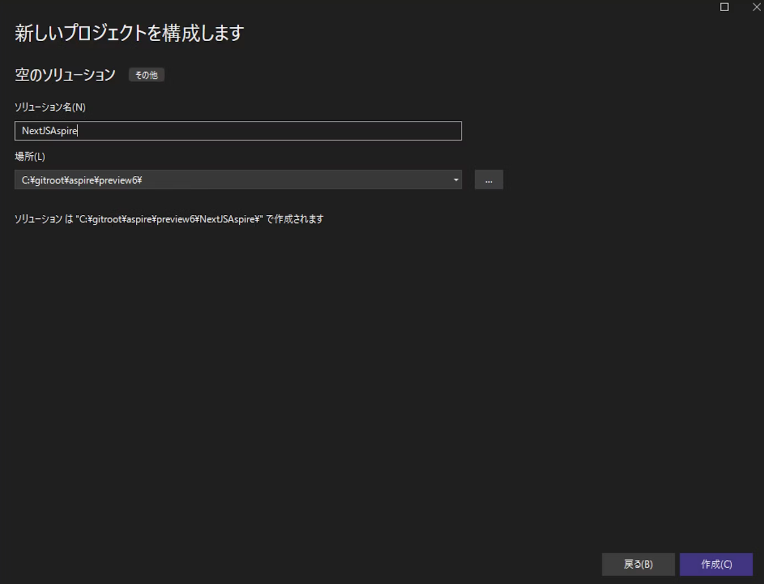
Create the ASP.NET Core project
Next, create an ASP.NET Core Web API project. We'll name the project WebApi.
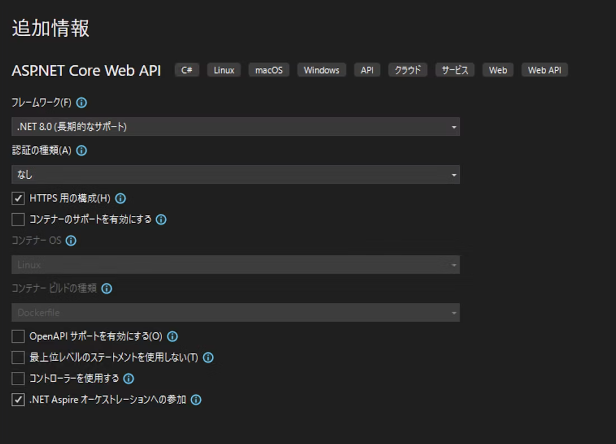
2. Create the frontend with Next.js
Open the directory containing the solution file in PowerShell, and run the following command to create the Next.js application.
- Next.js generation command
npx create-next-app@latest
- Settings during command execution (for reference)
PS C:\Repos\nextjs-aspire> npx create-next-app@latest
Need to install the following packages:
create-next-app@14.2.3
Ok to proceed? (y) y
√ What is your project named? ... frontend
√ Would you like to use TypeScript? ... Yes
√ Would you like to use ESLint? ... Yes
√ Would you like to use Tailwind CSS? ... Yes
√ Would you like to use `src/` directory? ... Yes
√ Would you like to use App Router? (recommended) ... Yes
√ Would you like to customize the default import alias (@/*)? ... Yes
√ What import alias would you like configured? ... @/*
Creating a new Next.js app in C:\Repos\nextjs-aspire\frontend.
3. Bring the Next.js application under .NET Aspire management
To manage a Node.js project with .NET Aspire, you need a library reference. Right-click the AppHost project, and select "Add" → ".NET Aspire Package".
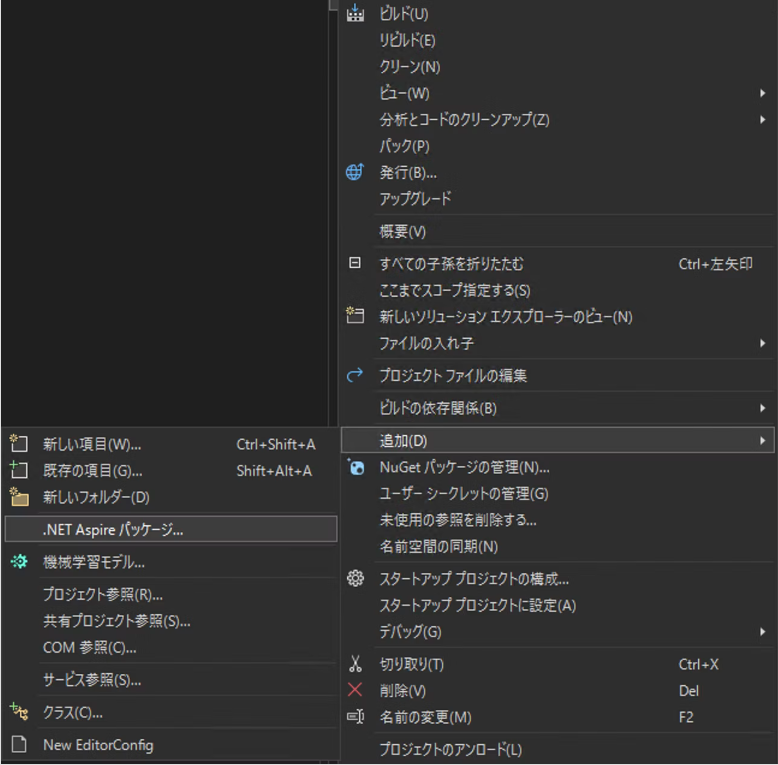
In the NuGet Package Manager screen that appears, add "Node" to the search string, and install the package for hosting Node.js.
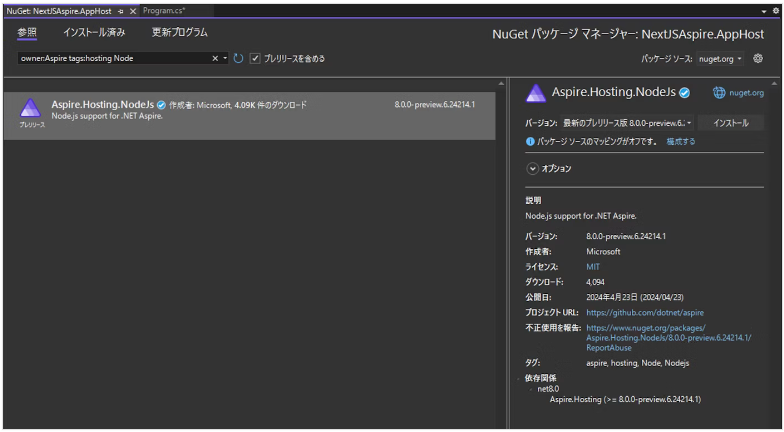
Implement the AppHost project's Program.cs as follows.
using Microsoft.Extensions.Hosting;

var builder = DistributedApplication.CreateBuilder(args);

var api = builder.AddProject<Projects.WebApi>("webapi");

var frontend = builder.AddNpmApp(name: "frontend", workingDirectory: "../frontend", scriptName: "dev")
    .WithHttpEndpoint(env: "PORT")
    .WithExternalHttpEndpoints()
    .WithReference(api);

if (builder.Environment.IsDevelopment() && builder.Configuration["DOTNET_LAUNCH_PROFILE"] == "https")
{
    frontend.WithEnvironment("NODE_TLS_REJECT_UNAUTHORIZED", "0");
}

builder.Build().Run();
4. Call the Web API from Next.js
Change the Web API endpoint
Before implementing this in Next.js, change the Web API's endpoint. Modify the WebApi project's Program.cs as follows.
var builder = WebApplication.CreateBuilder(args);

builder.AddServiceDefaults();

var app = builder.Build();

app.MapDefaultEndpoints();

app.UseHttpsRedirection();

var summaries = new[]
{
    "Freezing", "Bracing", "Chilly", "Cool", "Mild", "Warm", "Balmy", "Hot", "Sweltering", "Scorching"
};

// app.MapGet("weatherforecast", () =>
app.MapGet("api/weatherforecast", () => // <= api/ を追加
{
    var forecast = Enumerable.Range(1, 5).Select(index =>
        new WeatherForecast
        (
            DateOnly.FromDateTime(DateTime.Now.AddDays(index)),
            Random.Shared.Next(-20, 55),
            summaries[Random.Shared.Next(summaries.Length)]
        ))
        .ToArray();
    return forecast;
});

app.Run();

record WeatherForecast(DateOnly Date, int TemperatureC, string? Summary)
{
    public int TemperatureF => 32 + (int)(TemperatureC / 0.5556);
}
Call the Web API from Server Components
Modify frontend\src\app\server\page.tsx as follows.
const getData = async () => {
    const apiServer = process.env['services__webapi__https__0'] ?? process.env['services__webapi__http__0'];
    const weatherData: Response = await fetch(`${apiServer}/api/weatherforecast`, { cache: 'no-cache' });

    if (!weatherData.ok) {
        throw new Error('Failed to fetch data.');
    }

    const data = await weatherData.json();
    return data;
}

const Page = async () => {
    const data = await getData();
    return <main>{JSON.stringify(data)}</main>;
}

export default Page;
Call the Web API from Client Components
Modify frontend\src\app\client\page.tsx as follows.
'use client'

import { useEffect, useState } from 'react';

const getData = async () => {
  // NOTE:  WebApi プロジェクトの launchSettings.json ファイル > profiles > http > applicationUrl
  // "applicationUrl": "http://localhost:5291",
  const weatherData: Response = await fetch('http://localhost:5291/api/weatherforecast', { cache: 'no-cache' });

  if (!weatherData.ok) {
    throw new Error('Failed to fetch data.');
  }

  const data = await weatherData.json();
  return data;
}

const ClientPage = () => {
  const [data, setData] = useState([]);

  useEffect(() => {
    getData().then((data) => setData(data));
  }, []);

  return <main>{JSON.stringify(data)}</main>;
}

export default ClientPage;
At this point, a CORS error occurs, so in the next step we'll implement a reverse proxy.
5. Implement a reverse proxy with YARP
Add an empty ASP.NET Core application
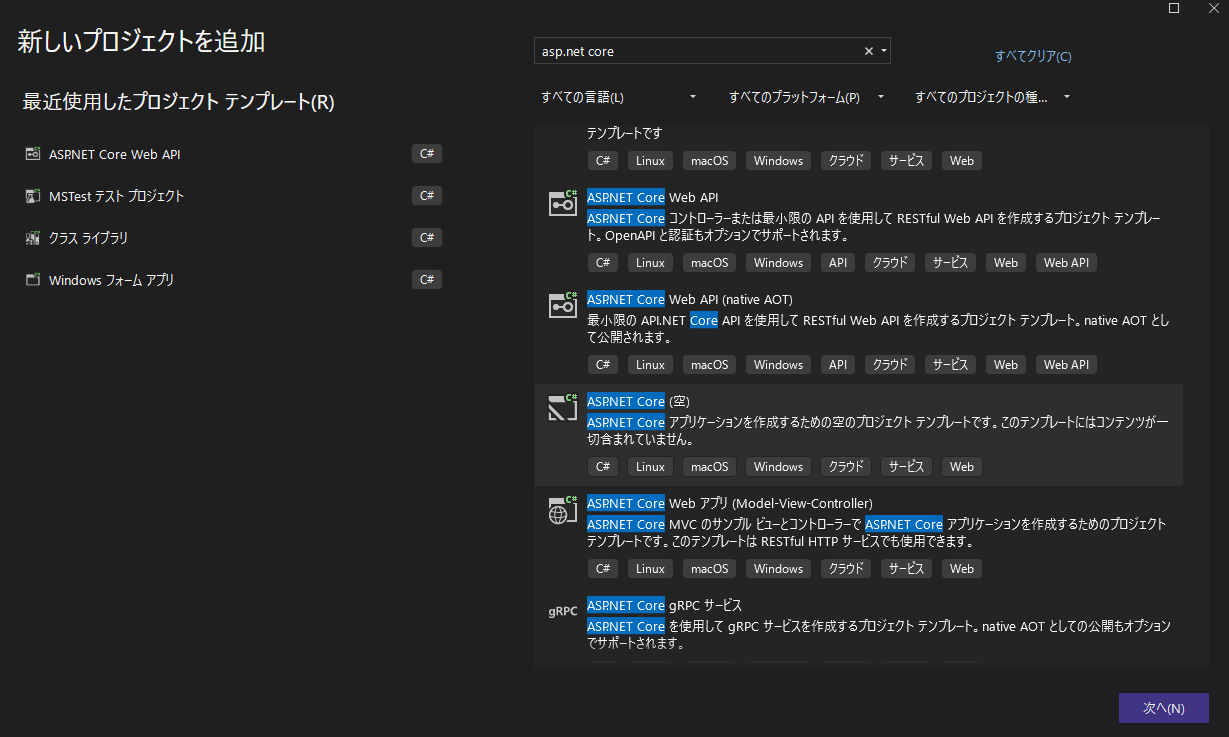
Add an ASP.NET Core (empty) project. We'll name the project ReverseProxy.
Implement the reference in the AppHost project
Modify NextJSAspire.AppHost\Program.cs as follows.
using Microsoft.Extensions.Hosting;

var builder = DistributedApplication.CreateBuilder(args);

var api = builder.AddProject<Projects.WebApi>("webapi");

var frontend = builder.AddNpmApp(name: "frontend", workingDirectory: "../frontend", scriptName: "dev")
    .WithHttpEndpoint(env: "PORT")
    .WithExternalHttpEndpoints()
    .WithReference(api);

if (builder.Environment.IsDevelopment() && builder.Configuration["DOTNET_LAUNCH_PROFILE"] == "https")
{
    frontend.WithEnvironment("NODE_TLS_REJECT_UNAUTHORIZED", "0");
}

builder.AddProject<Projects.ReverseProxy>("reverseproxy")
    .WithReference(frontend)
    .WithReference(api);

builder.Build().Run();
Install Microsoft.Extensions.ServiceDiscovery.Yarp
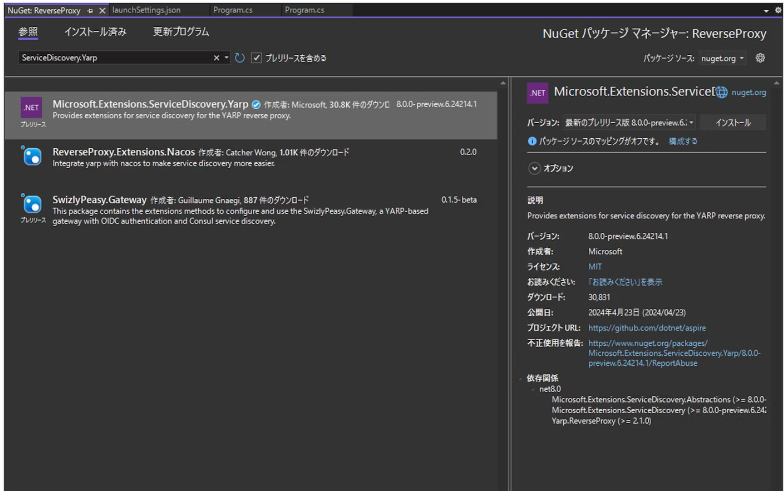
- Open the ReverseProxy project's NuGet package management screen.
- Install Microsoft.Extensions.ServiceDiscovery.Yarp.
Implement the reverse proxy
Implement ReverseProxy\Program.cs as follows.
using Yarp.ReverseProxy.Configuration;

var builder = WebApplication.CreateBuilder(args);

// NOTE: ServiceDiscovery を有効とする。
// AppHost プロジェクトで実装した Next.js と WebAPI プロジェクトへの参照を SerivceDiscovery で解決できるようになるが、
// YARP の場合は、これだけでは、ServiceDiscovery ができない。
builder.AddServiceDefaults();

// NOTE: AddReverseProxy は Yarp.ReverseProxy パッケージに含まれている YARP を使用することをパイプラインに適用するためのメソッド。
// Add したら Use するのがパイプラインの基本なので、Use を後で実装している(今回は、Map~ が Use に相当する)。
builder.Services.AddReverseProxy()
    .LoadFromMemory(GetRoutes(), GetClusters())
    .AddServiceDiscoveryDestinationResolver();

var app = builder.Build();

app.MapDefaultEndpoints();

// NOTE: パイプラインのUse
app.MapReverseProxy();

app.Run();

// GetRoutes メソッドで振り分けのルールを定義
RouteConfig[] GetRoutes()
{
    return
    [
        new RouteConfig
        {
            RouteId = "Route1",
            ClusterId = "default",
            Match = new RouteMatch { Path = "{**catch-all}" }
        },
        new RouteConfig
        {
            RouteId = "Route2",
            ClusterId = "api",
            Match = new RouteMatch { Path = "/api/{*any}" }
        },
    ];
}

// GetClusters メソッドで振り分け先のパスを定義
ClusterConfig[] GetClusters()
{
    return
    [
        new ClusterConfig
        {
            ClusterId = "default",
            Destinations = new Dictionary<string, DestinationConfig>
            {
                { "destination1", new DestinationConfig { Address = "http://frontend" } },
            }
        },
        new ClusterConfig
        {
            ClusterId = "api",
            Destinations = new Dictionary<string, DestinationConfig>
            {
                { "destination2", new DestinationConfig { Address =  "http://webapi", Host = "localhost" } },
            }
        },
    ];
}
Allow access from the reverse proxy on the Web API
Modify WebApi\Program.cs as follows.
var builder = WebApplication.CreateBuilder(args);

builder.AddServiceDefaults();

// ---- 追加 ここから ---- //
builder.Services.AddCors(x =>
{
    x.AddDefaultPolicy(policy =>
    {
        policy.AllowAnyHeader();
        policy.AllowAnyMethod();
        policy.AllowCredentials();
        policy.WithOrigins(new string[] { "https://localhost:7213", "http://localhost:5172" });
        // NOTE: 全ての Origin を許可する場合は、下記コード
        // policy.SetIsOriginAllowed(origin => true);
    });
});
// ---- 追加 ここまで ---- //

// Add services to the container.

var app = builder.Build();

// ---- 追加 ここから ---- //
app.UseCors();  // CORS有効のために追加
// ---- 追加 ここまで ---- //

app.MapDefaultEndpoints();

...
Fix the Web API call from Next.js CSR
Modify frontend\src\app\client\page.tsx as follows.
'use client'

import { useEffect, useState } from 'react';

const getData = async () => {
  const weatherData: Response = await fetch('/api/weatherforecast', { cache: 'no-cache' }) // <= ホスト名を削除

  ...
}
Now you can fetch data from the Web API through the reverse proxy. The dashboard now shows an extra ReverseProxy resource — click the ReverseProxy's endpoint link to display the initial screen, then go to /client to check whether you can fetch data from the Web API.
Related plants
More Tech articles →Building Desktop Ink - A Windows Screen Drawing App
Implementation story of a lightweight screen overlay app built with .NET 10 for marking during screen sharing in online meetings
#csharp#wpf#dotnetHow to Serve Next.js SSG (Static Site Generation) from Nx NestJS
This article explains how to use the monorepo tool Nx to serve a statically generated site created with Next.js SSG (Static Site Generation) from a Next.js application. With this approach, you can have both the frontend and backend in a single project.
#nx#nestjs#nextjsSpec for Codex: Seamless Spec‑Driven Development in VS Code
A VS Code extension that brings Kiro-compatible spec‑driven workflows to Codex CLI—manage Specs, Steering Docs, and Prompts visually and run tasks inline.
#vscode#codex#sdd