Next.js + ASP.NET Core + YARP を .NET Aspire で構成する
Next.js + ASP.NET Core + YARP(Reverse Proxy) を .NET Aspire で構成する方法
Next.jsとASP.NET Coreを組み合わせてプロジェクトを作成し、YARP (Yet Another Reverse Proxy) を利用してフロントエンドとバックエンドを連携させる手順を説明します。主な流れは下記となります。
- ASP.NET Coreを使用してWebAPIを構築する。
- Next.jsを使用してフロントエンドを構築する。
- .NET Aspireを使用してプロジェクトを管理し、YARPを使用してReverse Proxyを実装する。
- Next.jsからASP.NET Core WebAPIを呼び出す方法を説明する。
記事のソースコードはこちら (https://github.com/atman-33/nextjs-aspire)
参考URL
詳細な手順は以下の記事を参考にしています:
Next.js + ASP.NET Core を .NET Aspire で構成する(with YARP)
上記サイトの構築手順では、Next.jsのCSRページからWebApiを叩いた後のCORSエラーが解消されなかったため、そのエラー対応として本記事を参考にして頂けると幸いです。
1. WebAPIをASP.NET Coreで作成
空のソリューションを作成
まず、空のソリューションを作成します。ソリューション名はNextJSAspireとします。
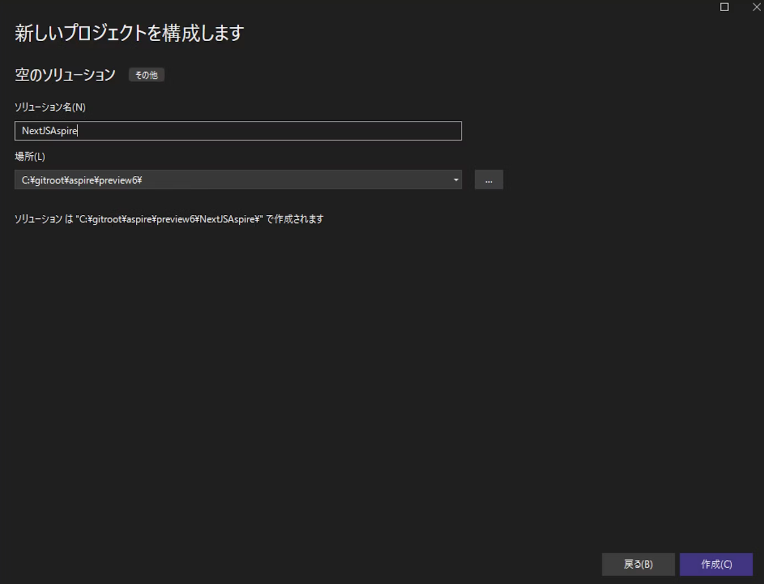
ASP.NET COREを作成
次に、ASP.NET Core Web APIプロジェクトを作成します。プロジェクト名はWebApiとします。
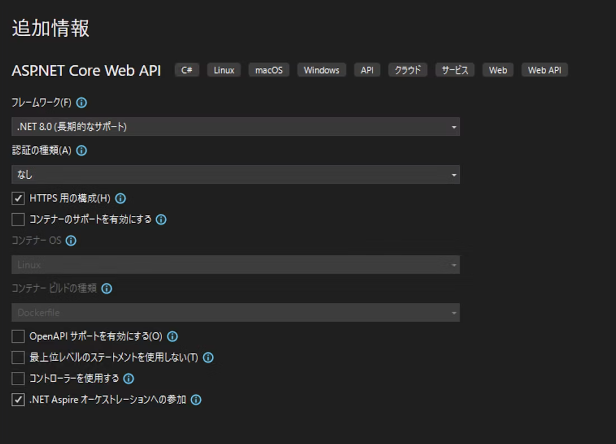
2. フロントエンドをNext.jsで作成
ソリューションファイルを作成したディレクトリをPowerShellで開き、以下のコマンドを実行してNext.jsアプリケーションを作成します。
- Next.js生成コマンド
npx create-next-app@latest
- コマンド実行後の各種設定(参考)
PS C:\Repos\nextjs-aspire> npx create-next-app@latest
Need to install the following packages:
create-next-app@14.2.3
Ok to proceed? (y) y
√ What is your project named? ... frontend
√ Would you like to use TypeScript? ... Yes
√ Would you like to use ESLint? ... Yes
√ Would you like to use Tailwind CSS? ... Yes
√ Would you like to use `src/` directory? ... Yes
√ Would you like to use App Router? (recommended) ... Yes
√ Would you like to customize the default import alias (@/*)? ... Yes
√ What import alias would you like configured? ... @/*
Creating a new Next.js app in C:\Repos\nextjs-aspire\frontend.
3. Next.jsアプリケーションを.NET Aspire管理にする
Node.jsプロジェクトを.NET Aspireで管理するためには、ライブラリ参照が必要です。AppHostプロジェクトを右クリックし、「追加」→「.NET Aspire パッケージ」を選択します。
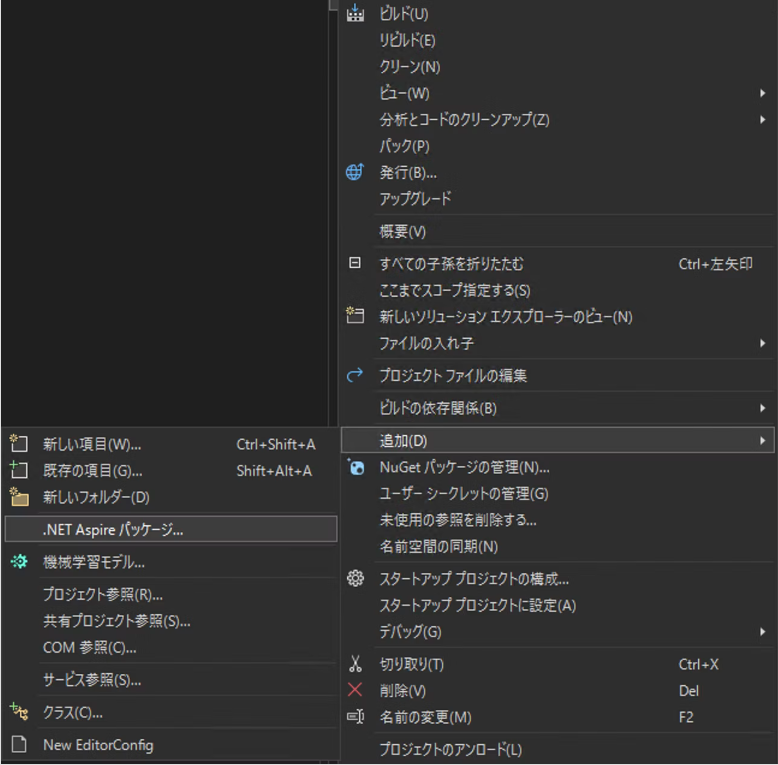
表示されたNuGetパッケージマネージャー画面で検索文字列に「Node」を追加し、Node.jsをホストするためのパッケージをインストールします。
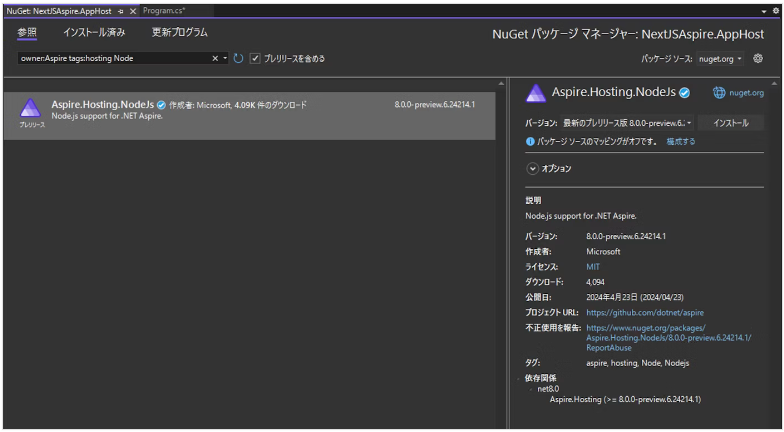
AppHostプロジェクトのProgram.csを次のように実装します。
using Microsoft.Extensions.Hosting;

var builder = DistributedApplication.CreateBuilder(args);

var api = builder.AddProject<Projects.WebApi>("webapi");

var frontend = builder.AddNpmApp(name: "frontend", workingDirectory: "../frontend", scriptName: "dev")
    .WithHttpEndpoint(env: "PORT")
    .WithExternalHttpEndpoints()
    .WithReference(api);

if (builder.Environment.IsDevelopment() && builder.Configuration["DOTNET_LAUNCH_PROFILE"] == "https")
{
    frontend.WithEnvironment("NODE_TLS_REJECT_UNAUTHORIZED", "0");
}

builder.Build().Run();
4. Next.jsからWebAPIを呼び出す
WebAPIのエンドポイントを変更
Next.jsの実装前に、WebAPIのエンドポイントを変更します。WebAPIプロジェクトのProgram.csを以下のように修正します。
var builder = WebApplication.CreateBuilder(args);

builder.AddServiceDefaults();

var app = builder.Build();

app.MapDefaultEndpoints();

app.UseHttpsRedirection();

var summaries = new[]
{
    "Freezing", "Bracing", "Chilly", "Cool", "Mild", "Warm", "Balmy", "Hot", "Sweltering", "Scorching"
};

// app.MapGet("weatherforecast", () =>
app.MapGet("api/weatherforecast", () => // <= api/ を追加
{
    var forecast = Enumerable.Range(1, 5).Select(index =>
        new WeatherForecast
        (
            DateOnly.FromDateTime(DateTime.Now.AddDays(index)),
            Random.Shared.Next(-20, 55),
            summaries[Random.Shared.Next(summaries.Length)]
        ))
        .ToArray();
    return forecast;
});

app.Run();

record WeatherForecast(DateOnly Date, int TemperatureC, string? Summary)
{
    public int TemperatureF => 32 + (int)(TemperatureC / 0.5556);
}
Server ComponentsからWebAPIを呼び出す
frontend\src\app\server\page.tsxを以下のように修正します。
const getData = async () => {
    const apiServer = process.env['services__webapi__https__0'] ?? process.env['services__webapi__http__0'];
    const weatherData: Response = await fetch(`${apiServer}/api/weatherforecast`, { cache: 'no-cache' });

    if (!weatherData.ok) {
        throw new Error('Failed to fetch data.');
    }

    const data = await weatherData.json();
    return data;
}

const Page = async () => {
    const data = await getData();
    return <main>{JSON.stringify(data)}</main>;
}

export default Page;
Client ComponentsからWebAPIを呼び出す
frontend\src\app\client\page.tsxを以下のように修正します。
'use client'

import { useEffect, useState } from 'react';

const getData = async () => {
  // NOTE:  WebApi プロジェクトの launchSettings.json ファイル > profiles > http > applicationUrl
  // "applicationUrl": "http://localhost:5291",
  const weatherData: Response = await fetch('http://localhost:5291/api/weatherforecast', { cache: 'no-cache' });

  if (!weatherData.ok) {
    throw new Error('Failed to fetch data.');
  }

  const data = await weatherData.json();
  return data;
}

const ClientPage = () => {
  const [data, setData] = useState([]);

  useEffect(() => {
    getData().then((data) => setData(data));
  }, []);

  return <main>{JSON.stringify(data)}</main>;
}

export default ClientPage;
この時点では、CORSエラーが発生するため、次のステップでReverse Proxyを実装します。
5. YARPでReverse Proxyを実装する
空のASP.NET Coreアプリケーションを追加する
ASP.NET Core(空)のプロジェクトを追加します。プロジェクト名はReverseProxyとします。
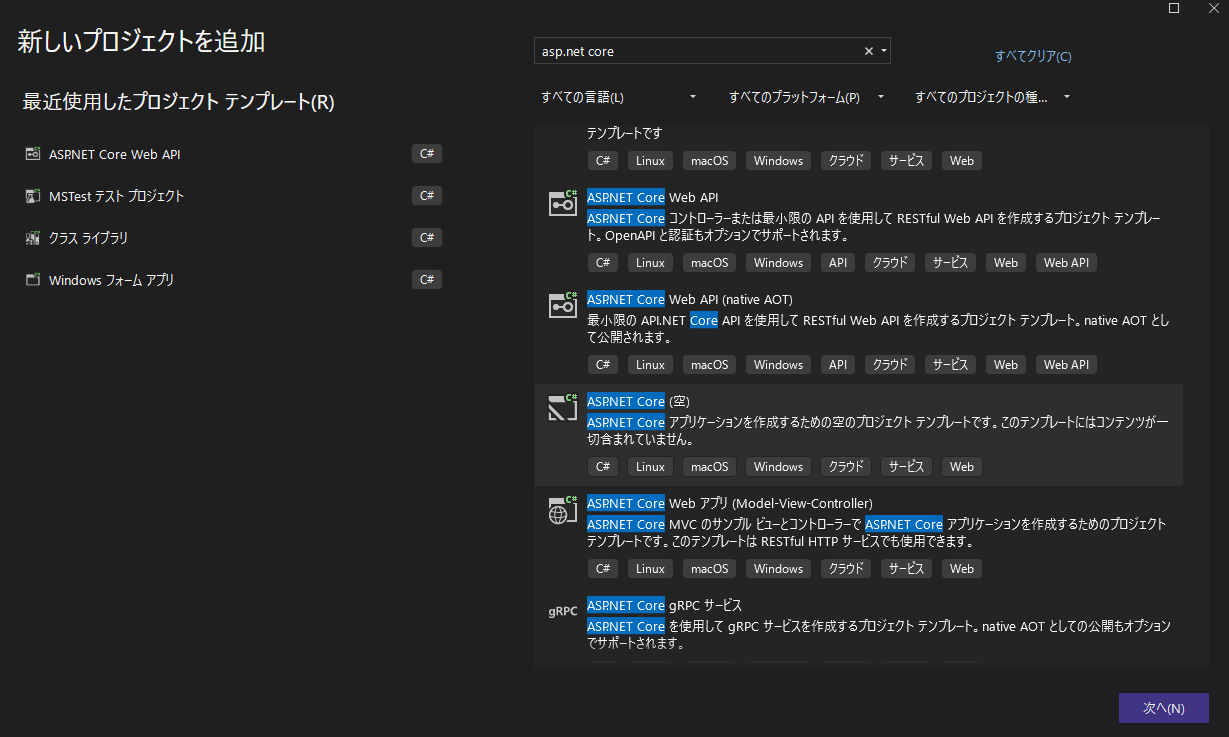
AppHostプロジェクトで参照先を実装する
NextJSAspire.AppHost\Program.csを以下のように修正します。
using Microsoft.Extensions.Hosting;

var builder = DistributedApplication.CreateBuilder(args);

var api = builder.AddProject<Projects.WebApi>("webapi");

var frontend = builder.AddNpmApp(name: "frontend", workingDirectory: "../frontend", scriptName: "dev")
    .WithHttpEndpoint(env: "PORT")
    .WithExternalHttpEndpoints()
    .WithReference(api);

if (builder.Environment.IsDevelopment() && builder.Configuration["DOTNET_LAUNCH_PROFILE"] == "https")
{
    frontend.WithEnvironment("NODE_TLS_REJECT_UNAUTHORIZED", "0");
}

builder.AddProject<Projects.ReverseProxy>("reverseproxy")
    .WithReference(frontend)
    .WithReference(api);

builder.Build().Run();
Microsoft.Extensions.ServiceDiscovery.Yarpをインストールする
- Reverse ProxyプロジェクトのNuGetパッケージ管理画面を開きます。
- Microsoft.Extensions.ServiceDiscovery.Yarpをインストールします。
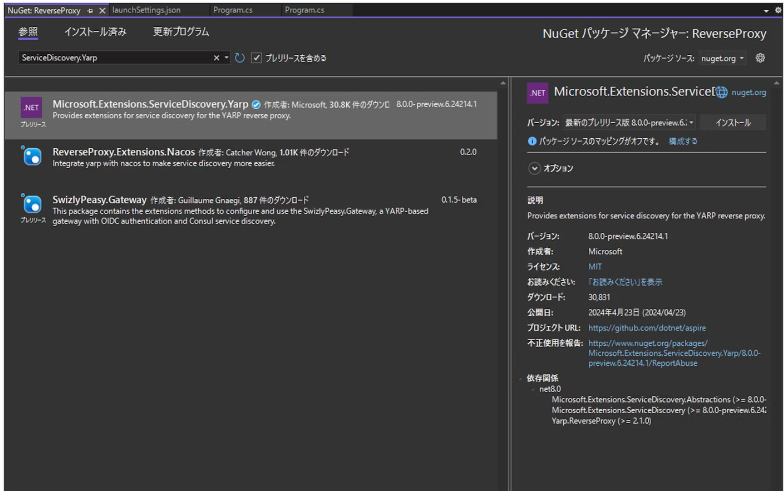
Reverse Proxyを実装する
ReverseProxy\Program.csを以下のように実装します。
using Yarp.ReverseProxy.Configuration;

var builder = WebApplication.CreateBuilder(args);

// NOTE: ServiceDiscovery を有効とする。
// AppHost プロジェクトで実装した Next.js と WebAPI プロジェクトへの参照を SerivceDiscovery で解決できるようになるが、
// YARP の場合は、これだけでは、ServiceDiscovery ができない。
builder.AddServiceDefaults();

// NOTE: AddReverseProxy は Yarp.ReverseProxy パッケージに含まれている YARP を使用することをパイプラインに適用するためのメソッド。
// Add したら Use するのがパイプラインの基本なので、Use を後で実装している(今回は、Map~ が Use に相当する)。
builder.Services.AddReverseProxy()
    .LoadFromMemory(GetRoutes(), GetClusters())
    .AddServiceDiscoveryDestinationResolver();

var app = builder.Build();

app.MapDefaultEndpoints();

// NOTE: パイプラインのUse
app.MapReverseProxy();

app.Run();

// GetRoutes メソッドで振り分けのルールを定義
RouteConfig[] GetRoutes()
{
    return
    [
        new RouteConfig
        {
            RouteId = "Route1",
            ClusterId = "default",
            Match = new RouteMatch { Path = "{**catch-all}" }
        },
        new RouteConfig
        {
            RouteId = "Route2",
            ClusterId = "api",
            Match = new RouteMatch { Path = "/api/{*any}" }
        },
    ];
}

// GetClusters メソッドで振り分け先のパスを定義
ClusterConfig[] GetClusters()
{
    return
    [
        new ClusterConfig
        {
            ClusterId = "default",
            Destinations = new Dictionary<string, DestinationConfig>
            {
                { "destination1", new DestinationConfig { Address = "http://frontend" } },
            }
        },
        new ClusterConfig
        {
            ClusterId = "api",
            Destinations = new Dictionary<string, DestinationConfig>
            {
                { "destination2", new DestinationConfig { Address =  "http://webapi", Host = "localhost" } },
            }
        },
    ];
}
WebApiに、Reverse Proxyからのアクセスを許可する
WebApi\Program.csを以下のように修正します。
var builder = WebApplication.CreateBuilder(args);

builder.AddServiceDefaults();

// ---- 追加 ここから ---- //
builder.Services.AddCors(x =>
{
    x.AddDefaultPolicy(policy =>
    {
        policy.AllowAnyHeader();
        policy.AllowAnyMethod();
        policy.AllowCredentials();
        policy.WithOrigins(new string[] { "https://localhost:7213", "http://localhost:5172" });
        // NOTE: 全ての Origin を許可する場合は、下記コード
        // policy.SetIsOriginAllowed(origin => true);
    });
});
// ---- 追加 ここまで ---- //

// Add services to the container.

var app = builder.Build();

// ---- 追加 ここから ---- //
app.UseCors();  // CORS有効のために追加
// ---- 追加 ここまで ---- //

app.MapDefaultEndpoints();

...
Next.jsのCSRからWebAPIの呼び出しを修正
frontend\src\app\client\page.tsxを以下のように修正します。
'use client'

import { useEffect, useState } from 'react';

const getData = async () => {
  const weatherData: Response = await fetch('/api/weatherforecast', { cache: 'no-cache' }) // <= ホスト名を削除

  ...
}
これで、Reverse Proxyを通じてWebAPIからデータを取得できるようになります。ダッシュボードにReverseProxyのリソースが増えているので、ReverseProxyのエンドポイントのリンクをクリックして初期画面を表示後、/clientにアクセスしてWebAPIからデータを取得可能か確認します。
関連コンテンツ
技術の記事をもっと見る →Windows画面に直接落書きできるアプリ作った話 - Desktop Ink
オンライン会議で画面共有中にマークできる、.NET 10で作った軽量な画面オーバーレイアプリの実装記録
#csharp#wpf#dotnetNx NestJSからNext.js SSG(静的サイト生成)を配信する方法
モノレポツールNxを使って、Next.jsのSSG(静的サイト生成)で作成した静的サイトをNext.jsアプリケーションから配信する方法を解説します。この方法により、フロントエンドとバックエンドを1つのプロジェクトにまとめることができます。
#nx#nestjs#nextjsSpec for Codex: 仕様書駆動開発をVS Codeでシームレスに
Codex CLI と緊密に連携し、仕様(Specs)・Steering Docs・Prompts を視覚的に管理できる VS Code 拡張機能。Kiro の開発体験を Codex ワークフローで再現します。
#vscode#codex#sdd